Deviation Actions
![Realistic Werewolf Headshot [Open]](https://images-wixmp-ed30a86b8c4ca887773594c2.wixmp.com/f/b2f11e07-ba54-4cad-8d0a-4bf1bc6538e0/dgnwz4p-21ba17b1-da12-4713-a99e-c600857ffec6.png/v1/fill/w_350,h_350,q_70,strp/realistic_werewolf_headshot__open__by_chrisd19_dgnwz4p-350t.jpg?token=eyJ0eXAiOiJKV1QiLCJhbGciOiJIUzI1NiJ9.eyJzdWIiOiJ1cm46YXBwOjdlMGQxODg5ODIyNjQzNzNhNWYwZDQxNWVhMGQyNmUwIiwiaXNzIjoidXJuOmFwcDo3ZTBkMTg4OTgyMjY0MzczYTVmMGQ0MTVlYTBkMjZlMCIsIm9iaiI6W1t7InBhdGgiOiJcL2ZcL2IyZjExZTA3LWJhNTQtNGNhZC04ZDBhLTRiZjFiYzY1MzhlMFwvZGdud3o0cC0yMWJhMTdiMS1kYTEyLTQ3MTMtYTk5ZS1jNjAwODU3ZmZlYzYucG5nIiwiaGVpZ2h0IjoiPD0xMjgwIiwid2lkdGgiOiI8PTEyODAifV1dLCJhdWQiOlsidXJuOnNlcnZpY2U6aW1hZ2Uud2F0ZXJtYXJrIl0sIndtayI6eyJwYXRoIjoiXC93bVwvYjJmMTFlMDctYmE1NC00Y2FkLThkMGEtNGJmMWJjNjUzOGUwXC9jaHJpc2QxOS00LnBuZyIsIm9wYWNpdHkiOjk1LCJwcm9wb3J0aW9ucyI6MC40NSwiZ3Jhdml0eSI6ImNlbnRlciJ9fQ.YUgLoneLfQ4_ksz2XZlxHHtQC2nnDPIydfq1IJy8nTM)


Description
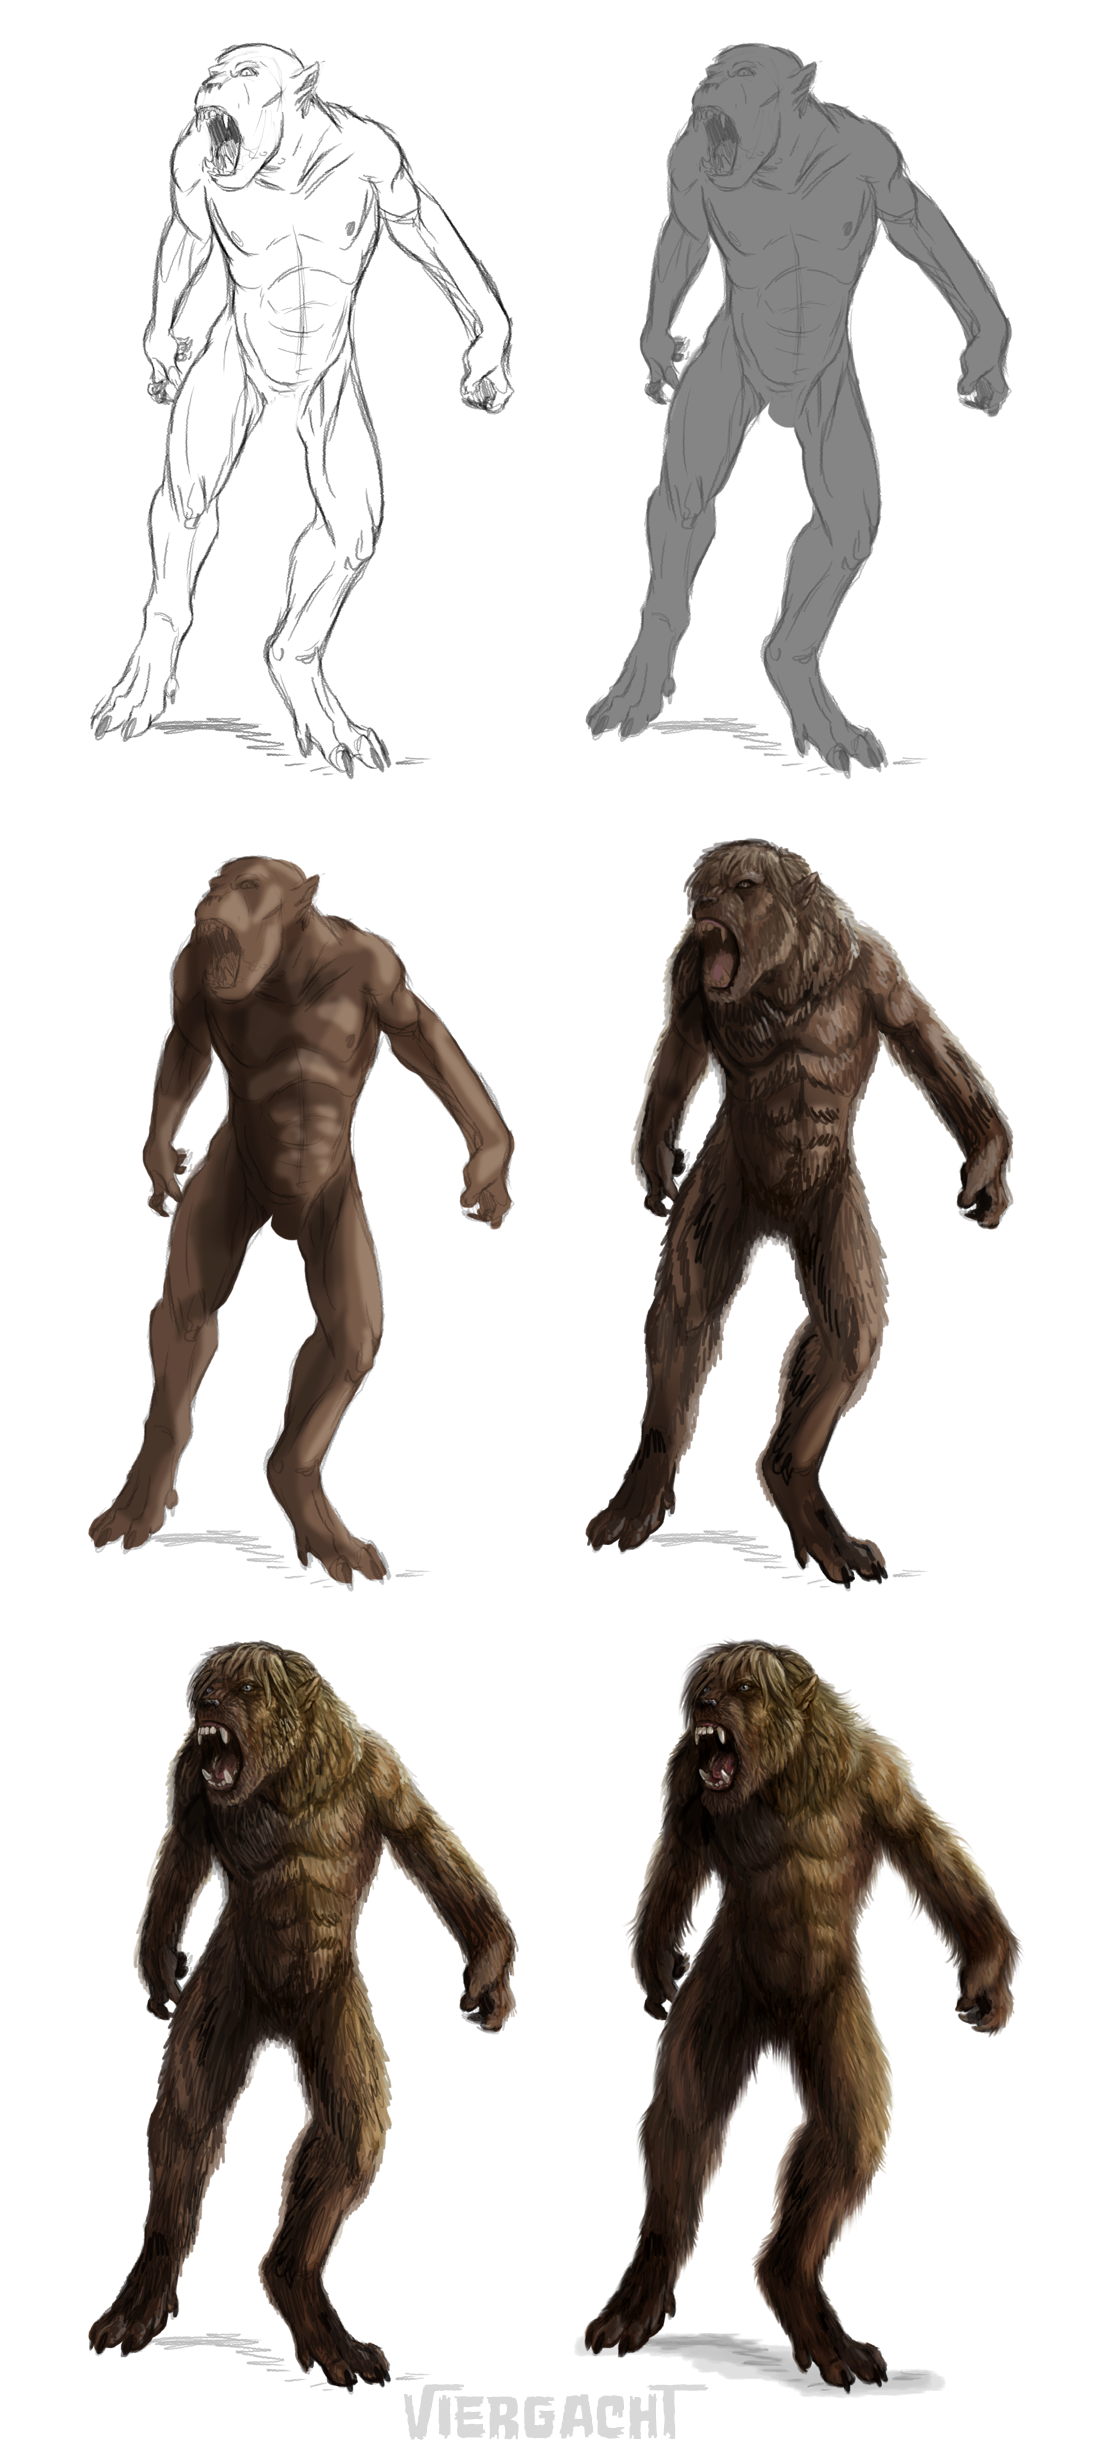
Sometimes people ask me to do tutorials, but I just kinda … flail at stuff until it looks ok. So I decided to save the steps for this one, maybe it’ll be helpful?
Werewolf speedpaint, this took me maybe 45 minutes. I use Photoshop elements & painted with the pastel medium tip brush set to various sizes & opacities on a 300 dpi A3 canvas.
Decided to work up the one werewolf sketch as Charlie, my newest character from the upcoming Werewolves Vs. Romance story, so I erased the danglies (not like you can really see them under the fur, but yeah). Filled everything in with a nice medium gray.
Usually I do the rough shading while it’s still gray and then use hue & saturation to get a base color. I start by lassoing the shadowiest areas and darkening them, then a slightly larger area, adding to the lasso’d area each time, then do the same with the lighter areas, then go in with the dodge & burn tools to refine smaller areas.
Charlie’s a pretty solid brownish gray with little color variation - darker hands, feet and muzzle, slightly lighter head hair & ruff. If the character has markings or there’s a strong color from the lighting or whatever I’ll just lasso and change the color at this stage - usually there’ll be a lot of color refinement and little bits of variation at the next step.
Fur starts as a bunch of scribbles in brighter and darker versions of the base color. There’s a faint outline of a paler, more neutral color - when I blend this will give the impression of light shining through semitranslucent tips of the fur. I love this sort of backlighting effect, it’s dramatic, adds some subtle realism and really pops the figure out of the background, like so, so and so. Not as obvious when the backdrop is white like this, but werewolf pictures tend to be dark and that’s when it looks the best.
Next, varying the color a bit, with the shadows bluer and less saturated and a gold cast in the most strongly lit areas. I leave details like eyes, teeth, claws and so on to the last, and do them on their own layer. Here I’ve just blocked them in roughly. Define chunks of fur with darker outlines. My cat Aly is an indispensable model, as her fur tends to stick together in sheafs or clumps. I should take a bunch of photos of her some time and post them so other folks can reference her, too.
Then grab the smudge tool, also pastel tip at about 82% strength, and start blending the scribbles into something that looks more like fur. Vary the sizes of the tool, the strength, and the direction of the strokes - depending on its texture and length, remember hair will float, hang, or move along with the character’s movement so don’t just spike it everywhere unless the character’s been electrocuted. Blending will even the shading out, so I usually go back in after it’s all done and add highlights and shadows back in to clumps of fur.
Finish off all the details - eyes, nose, mouth, claws and pads, and done! There’s Charlie.
Hello just wanted to stop by. You have such amazing art 😄 just curious if you take art trades?